Rustic Plum Puff Pastry Tart: Late Summer Perfection
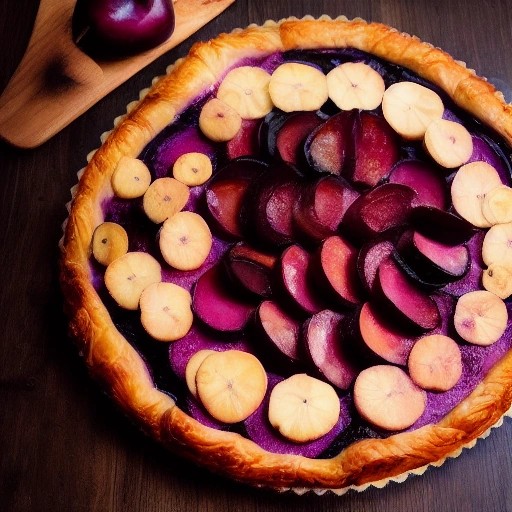
When plums are at their peak — deeply purple, sweet-tart, and fragrant — this rustic plum puff pastry tart is the only dessert that makes sense. No tart pan, no blind baking, no fussy lattice. Just a rough rectangle of buttery puff pastry piled with juicy plum wedges, a drizzle of honey, and a sprinkle of vanilla bean. The exposed edges of pastry bake into golden, flaky shards, while the plums soften and release their magenta juices into a jammy glaze.
This is what French bakers call a galette — a free-form tart that celebrates imperfection. The plums can be arranged in messy overlapping rows or scattered like jewels. It doesn’t matter. The tart will look gorgeous either way. Serve it warm with vanilla ice cream, a dollop of crème fraîche, or just on its own with a cup of tea. It’s simple, honest, and unforgettable.
Recipe Summary
Prep Time: 10 mins
Cook Time: 18-22 mins
Total Time: 28-32 mins
Servings: 6-8 (one large tart)
Difficulty: Very Easy
Ingredients
- 1 sheet (230g / 8 oz) all-butter puff pastry, thawed
- 4-5 medium ripe but firm plums (about 450g / 1 lb)
- 3 tablespoons granulated sugar
- 1 tablespoon cornstarch
- 1 teaspoon vanilla bean paste or vanilla extract
- 1 tablespoon honey (plus more for drizzling)
- 1 egg + 1 tablespoon water (egg wash)
- 1 tablespoon unsalted butter, cut into small cubes
- Optional: coarse sugar for sprinkling, fresh thyme sprigs
Step-by-Step Instructions
- Preheat oven to 400°F (200°C). Line a baking sheet with parchment paper.
- Prepare puff pastry. Unfold thawed pastry on a lightly floured surface. Gently roll into a 10×14-inch rectangle. Transfer to the prepared baking sheet.
- Score a border (optional). For a more rustic look, skip the border and simply fold the edges up after adding fruit. For cleaner edges, lightly score a ½-inch border around the rectangle. Do not cut through.
- Prepare plums. Wash plums. No need to peel (the skin adds color and texture). Halve, remove pits, and slice into ¼-inch thick wedges.
- Make plum filling. In a medium bowl, gently toss plum slices with sugar, cornstarch, and vanilla bean paste.
- Arrange plums. Pile the plum mixture inside the scored border (or in the center of the pastry if going rustic). Leave a 1½ to 2-inch border of bare pastry around the edges.
- Fold the edges. Fold the bare pastry border up and over the edge of the plums, pleating as you go. The center of the tart should remain open.
- Add toppings. Dot the plums with butter cubes. Drizzle honey over everything.
- Egg wash the crust. Brush the folded pastry edges with egg wash. Sprinkle with coarse sugar if desired.
- Bake. Bake for 18-22 minutes until the pastry is puffed and deep golden brown, and the plum juices are bubbling and thick. Rotate the pan halfway through.
- Cool slightly. Let the tart cool on the baking sheet for 10-15 minutes. The juices will set as it cools.
- Serve. Drizzle with extra honey, garnish with fresh thyme if desired, and serve warm or at room temperature.
Tips for the Best Rustic Plum Puff Pastry Tart
- Choose the right plums. Italian prune plums (small, oval, dark purple) are ideal — they’re firmer and less juicy. Black plums, red plums, or Santa Rosa plums also work well. Avoid very soft, overripe plums — they’ll turn to soup.
- Don’t skip the cornstarch. Plums are juicy. Cornstarch thickens their liquid into a glossy, jammy sauce instead of a watery puddle.
- Keep pastry cold. If the dough feels soft before baking, chill the assembled tart for 10 minutes. Cold butter = maximum puff and cleaner folds.
- Don’t overfill. Leave a generous border of bare pastry (1½ to 2 inches). Overfilling causes leakage and prevents the crust from rising properly.
- Pleat, don’t crimp. When folding the edges, use small pleats (like folding a paper fan). This prevents tearing and creates a beautiful rustic edge.
5 Delicious Variations
- Plum & Almond Tart: Spread ¼ cup almond paste or frangipane over the pastry before adding plums. Top with sliced almonds. The almond-plum pairing is classic.
- Spiced Plum Tart: Add ½ teaspoon ground cardamom and ¼ teaspoon ground ginger to the sugar. These warm spices are incredible with plums.
- Plum & Lavender Tart: Add 1 teaspoon dried culinary lavender to the sugar. Use orange blossom honey for a floral, elegant tart.
- Plum & Dark Chocolate: Scatter ¼ cup dark chocolate chips over the plums during the last 5 minutes of baking. The chocolate melts into the jammy juices.
- Salted Honey Plum Tart: Use 2 tablespoons honey (instead of 1). After baking, sprinkle with flaky sea salt. The salty-sweet contrast is addictive.
Storage & Reheating Instructions
Room temperature: Store in an airtight container for up to 2 days. The pastry will soften, but the plum filling stays delicious.
Refrigerator: Plum tart can be refrigerated for up to 3 days. Bring to room temperature or reheat before serving.
To reheat: Place on a baking sheet in a 350°F (175°C) oven for 8-10 minutes. This re-crisps the pastry beautifully. Do not microwave — it makes the pastry chewy and the plums mushy.
Freezer (unbaked): Assemble the tart on a parchment-lined tray. Freeze until solid, then wrap tightly. Bake from frozen at 400°F for 25-30 minutes, adding egg wash just before baking. Not recommended for baked tart — the plums become watery.
Frequently Asked Questions (FAQ)
1. Can I use plums that are slightly underripe?
Yes, slightly underripe plums are actually perfect for baking. They hold their shape better and release less liquid than fully ripe plums. If your plums are very firm, add 1-2 minutes to the baking time. If they’re very soft and juicy, add an extra ½ tablespoon of cornstarch.
2. Why is my tart soggy on the bottom?
Plums release juice as they bake. To prevent sogginess: don’t use overripe plums, use cornstarch (it’s essential), and bake on the lowest oven rack for the last 5 minutes. Also, make sure your pastry border is folded high enough to contain the juices — leaks cause sogginess. You can also sprinkle 1 tablespoon of ground almonds or breadcrumbs over the pastry before adding plums to absorb moisture.
3. Do I need to peel the plums?
No. Plum skin is thin and becomes tender when baked. It also adds beautiful color (the skin turns a deep, jewel-toned purple-red). If you really dislike skin, you can peel the plums — blanch them in boiling water for 30 seconds, then plunge into ice water. The skin will slip right off. But honestly, don’t bother — the skin is part of the rustic charm.
4. Can I use other stone fruits?
Absolutely. This method works beautifully with peaches, nectarines, apricots, and cherries. For peaches and nectarines (peel if desired), use the same sugar amount. For apricots (smaller, tarter), reduce sugar to 2 tablespoons. For cherries (pitted and halved), bake for 20-22 minutes — they need a little longer.
5. Can I make mini plum tarts instead of one large one?
Yes. Cut the puff pastry into 6-8 smaller rectangles or squares. Place a spoonful of plum mixture in the center of each, fold the edges up, and pleat. Bake for 12-15 minutes. Mini tarts are perfect for brunch buffets or portion control.
This rustic plum puff pastry tart is the dessert I make every late summer when plums are at their peak. The combination of flaky, buttery pastry, sweet-tart plums, and golden honey is pure magic. It’s simple enough for a weeknight but special enough for a dinner party. Make it before plum season ends — you’ll be glad you did. Happy baking from PastryTest.com!