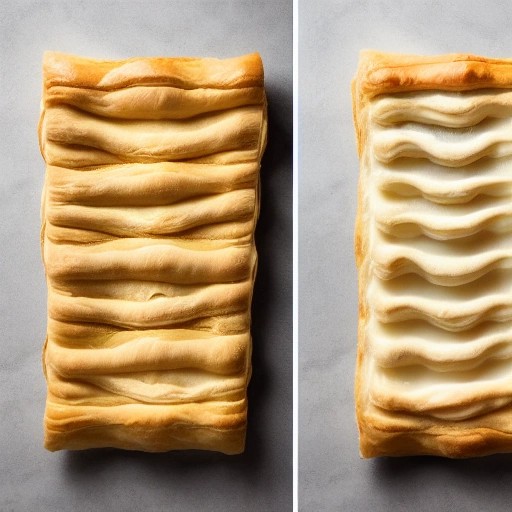
Butter vs Shortening in Puff Pastry Lamination
Butter vs Shortening in Puff Pastry Lamination: Which One is Better for Home Bakers?
If you’ve ever tried making puff pastry from scratch, you know the magic happens during lamination—the process of folding and rolling butter into dough to create those incredible, flaky layers. But here’s the million-dollar question: should you use butter or shortening for the job?
This is one of the most common dilemmas for home bakers. Both fats have their fans, but they behave very differently when it comes to creating that perfect puff. In this post, we’ll break down the pros and cons of each so you can decide which fat is right for your baking style and your pastry.
Recipe Summary: Classic Puff Pastry with Butter
Prep Time: 30 mins
Cook Time: 15–20 mins (baking)
Total Time: 3 hours (including chilling)
Servings: Makes about 1.5 lbs of dough
Difficulty: Medium
Ingredients
- 2 ½ cups all-purpose flour
- 1 teaspoon salt
- 1 cup very cold unsalted butter (or shortening, see variations below)
- ½ to ¾ cup ice water
What’s the Difference Between Butter and Shortening in Lamination?
Butter is an animal fat made from cream. It contains about 80% fat and 20% water. That water is what creates steam during baking, giving puff pastry those beautiful airy layers.
Shortening, on the other hand, is 100% vegetable fat. It has no water and melts at a higher temperature than butter. This makes it more stable but also changes the final texture of your pastry.
How Butter Affects Puff Pastry Lamination
Butter is the traditional choice for classic puff pastry. Its flavor is unmatched. When butter melts in the oven, the water turns into steam. That steam pushes the layers apart, creating flaky, crispy pastry with a rich taste.
However, butter has a lower melting point (around 90°F). That means it can start to soften quickly while you’re rolling. If it gets too warm, it can leak out of the dough or even get absorbed into the flour. That’s why it’s important to work quickly and keep everything cold when using butter.
How Shortening Changes Puff Pastry
Shortening is 100% fat with zero water. It stays firm at room temperature and melts at a much higher temperature than butter (around 115°F to 120°F). This makes it more forgiving for beginner bakers who might not work as quickly.
The downside? Since there’s no water, there’s less steam. The result is less rise and fewer layers. You’ll still get a tender pastry, but it won’t puff up as dramatically as it would with butter. It also lacks the buttery flavor that many people love.
Butter vs Shortening: A Side-by-Side Comparison
Flavor: Butter wins hands down. It gives puff pastry that signature rich, creamy taste. Shortening adds no flavor, so you’ll want to rely on other ingredients for taste.
Flakiness: Butter creates more layers because steam pushes the dough apart. Shortening creates a more tender, biscuit-like texture but fewer distinct layers.
Ease of Use: Shortening is more forgiving because it doesn’t soften as quickly. Beginners often find it easier to work with. Butter requires speed and lots of chilling.
Baking Temperature: Butter-based pastries are usually baked at a higher temperature (around 400°F) to create steam quickly. Shortening pastries bake at lower temperatures since there’s no water to turn into steam.
Which Fat Should You Choose for Your Puff Pastry?
For the classic, high-rising, flaky, and flavorful puff pastry, choose butter. Most professional bakers and French pastry chefs use butter for a reason. It delivers the taste and texture that makes puff pastry so special.
If you’re a beginner who wants a more forgiving dough, or you’re making a pastry where flavor isn’t the star (like a savory pot pie top), shortening can be a great option. Many bakers even use a combination of the two—butter for flavor and shortening for stability.
Step-by-Step Instructions: Making Butter Puff Pastry
- Make the dough (détrempe): In a large bowl, mix flour and salt. Gradually add ice water and mix until a rough dough forms. Knead lightly just until it comes together. Shape into a rectangle and chill for 30 minutes.
- Prepare the butter block: Place cold butter between two sheets of parchment paper. Use a rolling pin to pound and shape it into a 6×6 inch square. Keep it cold.
- Encase the butter: Roll the dough into a 10×10 inch square. Place the butter block in the center at a 45-degree angle. Fold the dough corners over the butter, sealing it completely like an envelope.
- First turn (fold): Roll the dough into a long rectangle (about 8×20 inches). Fold it like a letter—fold the bottom third up, then the top third down. Wrap and chill for 30 minutes.
- Repeat turns: Complete 5 to 6 total turns, chilling for 30 minutes between each one. Always rotate the dough 90 degrees before rolling out again.
- Rest and bake: After the final turn, chill the dough for at least 2 hours. Then roll it out, shape it, and bake at 400°F until golden and puffed.
Tips for Perfect Puff Pastry Lamination
Keep everything cold. Cold fat is the secret to great puff pastry. If your butter starts to soften, stop and chill the dough for 20 minutes before continuing.
Work fast. The longer you handle the dough, the warmer it gets. Keep your movements quick and efficient.
Use a bench scraper. This tool is great for lifting the dough and cleaning your work surface. It helps prevent sticking and tearing.
Don’t overwork the dough. Overworking can develop too much gluten, making the pastry tough instead of tender.
Rest between turns. Resting allows the gluten to relax. If you skip this, the dough can shrink or tear during rolling.
Variations for Your Puff Pastry
1. Rough Puff Pastry: Instead of a solid butter block, cut cold butter into small cubes and roughly mix into the dough. Fold and roll just a few times. Less work, still tasty.
2. Vegan Puff Pastry: Use high-quality vegan butter or a combination of coconut oil and vegetable shortening. Keep it cold and follow the same laminating steps.
3. Whole Wheat Puff Pastry: Substitute up to half of the all-purpose flour with whole wheat flour. The pastry will be slightly denser but more flavorful.
4. Herb-Infused Pastry: Add dried herbs like thyme or rosemary to the dough or the butter block. Great for savory tarts and galettes.
5. Chocolate Puff Pastry: Roll the dough into a long rectangle, scatter with chocolate chunks or cocoa powder, and fold like a letter. Perfect for quick turnovers.
How to Store and Reheat Your Puff Pastry
Storing unbaked dough: Wrap the dough tightly in plastic wrap and store in the refrigerator for up to 3 days. For longer storage, freeze for up to 3 months. Thaw overnight in the fridge before using.
Storing baked pastries: Store baked goods in an airtight container at room temperature for up to 2 days. They’re best enjoyed fresh but can be revived in the oven.
Reheating: To bring back the crispness, bake at 350°F for 5–7 minutes. Avoid using the microwave, as it will make the pastry soggy.
Frequently Asked Questions
Can I use half butter and half shortening in puff pastry?
Yes! Many bakers love this combination. The butter gives great flavor and the shortening adds stability. Just use equal parts by weight and work quickly to keep the fats cold.
Why did my puff pastry not rise?
The most common reason is that the butter leaked out during rolling or baking. Make sure to keep everything cold, seal the butter block properly, and bake at a high enough temperature (around 400°F) to create steam quickly.
Can I use margarine instead of butter or shortening?
Margarine contains water and can work in a pinch, but it often has a lower melting point and can make the dough sticky. For best results, stick with butter or shortening.
How many folds should I do for puff pastry?
For classic puff pastry, aim for 5 to 6 turns (folds). This creates enough layers—over a thousand!—without overworking the dough. Each turn should be followed by chilling.
Can I make puff pastry without a rolling pin?
If you don’t have a rolling pin, use a clean wine bottle or a sturdy glass. Just make sure the surface is smooth and dusted with flour to prevent sticking.