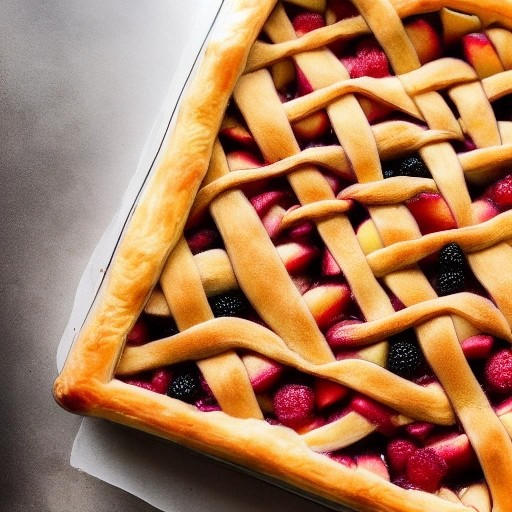
Rustic Fruit Pie Slab with Ready-Made Puff Pastry
A fruit pie slab is the easiest way to serve a crowd—all the delicious flavour of a classic pie, but baked on a sheet pan and cut into perfect squares. Using ready-made puff pastry makes this rustic dessert incredibly simple to assemble, with no rolling or fussing with finicky pie dough. The buttery, flaky pastry bakes up golden and crisp, providing the ideal contrast to a warm, jammy fruit filling .
This recipe is endlessly adaptable to whatever fruit is in season. From tart apples and juicy peaches to mixed summer berries, the filling comes together in minutes. It’s the perfect dessert for potlucks, holiday gatherings, or any time you need an impressive treat without the stress.
Recipe Summary
Prep Time: 20 mins
Cook Time: 25-30 mins
Total Time: 45-50 mins
Servings: 12-16 squares
Difficulty: Easy
Ingredients
- 2 sheets puff pastry (about 320g each), thawed overnight in the fridge
- 5-6 cups fruit (apples, peaches, berries, or a mix), prepared
- ½ cup granulated sugar (adjust based on fruit sweetness)
- 2 tablespoons cornstarch (or flour)
- 1 teaspoon ground cinnamon (optional, for apples or peaches)
- 1 tablespoon lemon juice
- 1 egg, beaten (for egg wash)
- Coarse sugar, for sprinkling (optional)
How to Make a Rustic Fruit Slab Pie
Follow these simple steps for a beautifully golden, flaky fruit slab pie.
- Preheat your oven to 400°F (200°C) and line a large baking sheet or 10×15-inch jelly roll pan with parchment paper .
- Prepare the fruit filling. In a large bowl, combine your chosen fruit, sugar, cornstarch, cinnamon (if using), and lemon juice. Toss until the fruit is evenly coated . Note: For apples or pears, slice them thinly—about ¼ inch thick—for even cooking . Pre-cook firm fruits like apples or pears slightly to soften them and prevent a soggy bottom .
- Assemble the base. On a lightly floured surface, gently roll out one sheet of puff pastry to fit your pan. Transfer it to the prepared baking sheet and press it into the corners .
- Add the filling. Spread the fruit filling evenly over the pastry, leaving a 1-inch border around the edges . Use a slotted spoon to transfer the fruit to avoid adding too much excess liquid, which can make the crust soggy .
- Top and seal. Roll out the second sheet of puff pastry to the same size as the base. Carefully place it over the filling. Press the edges of the top and bottom pastry together to seal, then crimp with a fork for a decorative finish .
- Add vents and egg wash. Cut several small slits in the top pastry to allow steam to escape . Brush the entire top with the beaten egg wash and sprinkle with coarse sugar for extra crunch .
- Bake. Place the pan in the preheated oven and bake for 25-30 minutes, or until the pastry is puffed and deep golden brown and the filling is bubbly around the edges .
- Cool and serve. Let the pie cool in the pan on a wire rack for at least 20-30 minutes. This allows the filling to set, making it easier to slice . Cut into squares and serve warm or at room temperature. A scoop of vanilla ice cream is the perfect finishing touch .
5 Tips for the Perfect Slab Pie
Keep the pastry cold. For the flakiest layers, ensure your puff pastry is cold when you assemble the pie. If it becomes warm and sticky, pop it back in the fridge for 10 minutes before baking .
Don’t overfill. Too much fruit filling can make the pastry soggy and cause it to leak. Stick to the recommended amount and use a slotted spoon to drain excess juices .
Use a mix of fruits. Combining sweet and tart varieties—like Granny Smith and Honeycrisp apples—gives the best flavour and texture. For apples, choose varieties that hold their shape when baked .
Pre-cook firm fruits. For apples, pears, or peaches, a quick pre-cook on the stove helps release some moisture and deepens the flavour, preventing a watery pie .
Let it rest. Cooling the pie before slicing is crucial. It allows the filling to set so you get clean, neat squares instead of a runny mess .
3 Delicious Variations to Try
Summer Berry Slab Pie. Use a mix of fresh or frozen berries—strawberries, blueberries, raspberries, and blackberries. Toss them with sugar, cornstarch, and a squeeze of lemon. No pre-cooking needed for berries .
Peach and Cinnamon Slab Pie. For a perfect summer dessert, use juicy ripe peaches. Peel them using the blanching method, slice, and toss with sugar, cinnamon, and a pinch of nutmeg. Pre-cook them slightly to avoid a watery filling .
Pear and Ginger Slab Pie. Swap the apples for pears and add a tablespoon of finely chopped crystallized ginger to the filling. The ginger adds a warm, spicy note that pairs beautifully with the subtle sweetness of pears .
How to Store and Reheat
Store leftover slab pie in an airtight container in the refrigerator for up to 3 days .
To reheat, place slices in a preheated oven at 350°F (180°C) for 5-10 minutes to restore the crispness of the pastry. Avoid the microwave, as it will make the crust soft .
You can also freeze the baked and cooled pie. Wrap it well and freeze for up to 4 months .
Frequently Asked Questions
Can I use frozen fruit?
Yes, frozen fruit works well, especially for berry slab pies. Thaw and drain the fruit thoroughly before using to remove excess moisture. You may need to add an extra teaspoon of cornstarch to thicken the filling .
Why is my pastry soggy on the bottom?
A soggy bottom is usually caused by too much liquid in the filling. Pre-cooking firm fruits and using a slotted spoon to avoid adding extra juices helps solve this. For an extra crisp base, you can pre-bake the bottom pastry for 5 minutes before adding the filling .
Can I make this ahead of time?
Yes, you can assemble the pie a day ahead, cover it, and refrigerate it unbaked. Bake it fresh just before serving. You can also bake the pie fully, cool it, and reheat it in the oven .
Can I use a different pastry?
Absolutely. While puff pastry gives a flaky, buttery result, you can use shortcrust pastry for a more traditional, crumbly texture .
Why do I need to cut slits in the top?
The slits allow steam to escape during baking. Without them, the steam gets trapped, causing the pastry to burst open and making the filling watery .